What Is Contouring and How Does It Work?
Face contouring is a makeup technique that uses light and shadows to add dimension, sculpt cheekbones, and enhance your natural bone structure—without completely altering your face. Think of it as the makeup equivalent of chiaroscuro in painting: dark recedes, while light advances.
Contour vs. Bronzer
A true contour product is usually cool or neutral in undertone, designed to mimic a real shadow. Bronzer, by contrast, carries warm, sun-kissed tones meant to add warmth rather than structure. Avoid using warm-toned bronzers for contouring, as they do not mimic natural shadows.
The Shadow — Darker Shade
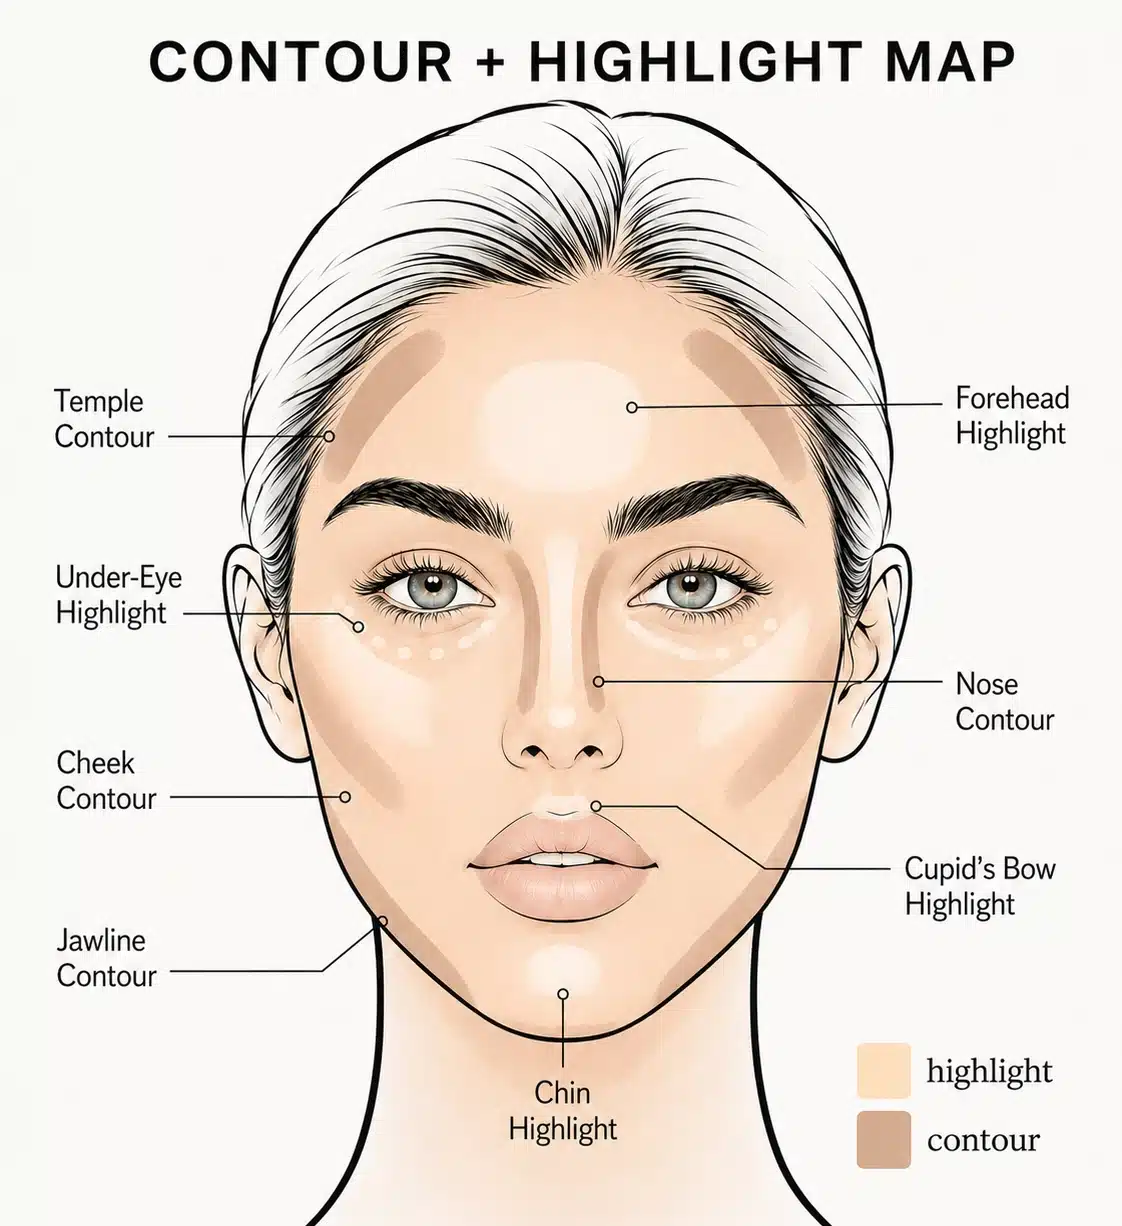
Used to sculpt and recede areas like the jawline, the sides of the nose, and the hollows of the cheeks.
The Highlight — Lighter Shade
Applied to high points that catch light, such as the tops of the cheekbones, bridge of the nose, brow bone, and cupid's bow.

Before You Begin: Skin Prep and Base Makeup
Start with clean, moisturized skin for the best results. A good skincare routine enhances makeup application, and double cleansing reveals a glowing complexion before you even touch your makeup bag.
Fast Prep Checklist
- Cleanse: Wash gently, then apply a lightweight hydrator or moisturizer.
- Prime: Use a primer to smooth skin texture and help makeup stay put.
- Protect: Apply SPF every morning before any base makeup.
- Base: Apply foundation after primer for an even base—always match it to your neck for the most natural transition.
- Conceal: Use concealer only where needed, such as under the eyes, around redness, or over blemishes.
Pro Tip on Textures: Keep your base thin. If you plan to use a cream contour, keep your foundation and blush in cream or liquid textures. If you prefer a powder contour, lightly set your foundation with translucent powder first so the product blends smoothly rather than clinging to damp patches.
Your Contour Toolkit: Products and Tools You Actually Need
Beginners only need two to three core products and a couple of basic tools. Contour products come in cream, powder, and liquid forms.
| Product Type | Best For | Finish |
|---|---|---|
| Cream Contour Stick or pot |
Normal, dry, or mature skin | Dewy, skin-like, and highly blendable |
| Powder Contour | Oily skin and long-wear days | Matte and easily buildable |
| Liquid Contour | Versatility and lightweight layering | Seamless and lightweight |
Choosing Your Shade
Select a contour shade that is one to two shades darker than your skin tone.
- Fair Skin: Look for a cool, grayish-taupe shade.
- Medium to Deep Skin: Select a neutral-cool brown that avoids looking ashy or muddy.
Essential Tools
- A fluffy angled brush for powder application.
- A small, dense brush for nose or detailed work.
- A damp makeup sponge for blending harsh cream edges.
- A subtle, non-glittery cream or powder highlighter.
Note: In a pinch, you can contour your face using a deeper foundation or concealer stick, but dedicated contour products generally yield a more natural, sculpted result.
How to Contour Your Face: A Step-by-Step Beginner Routine
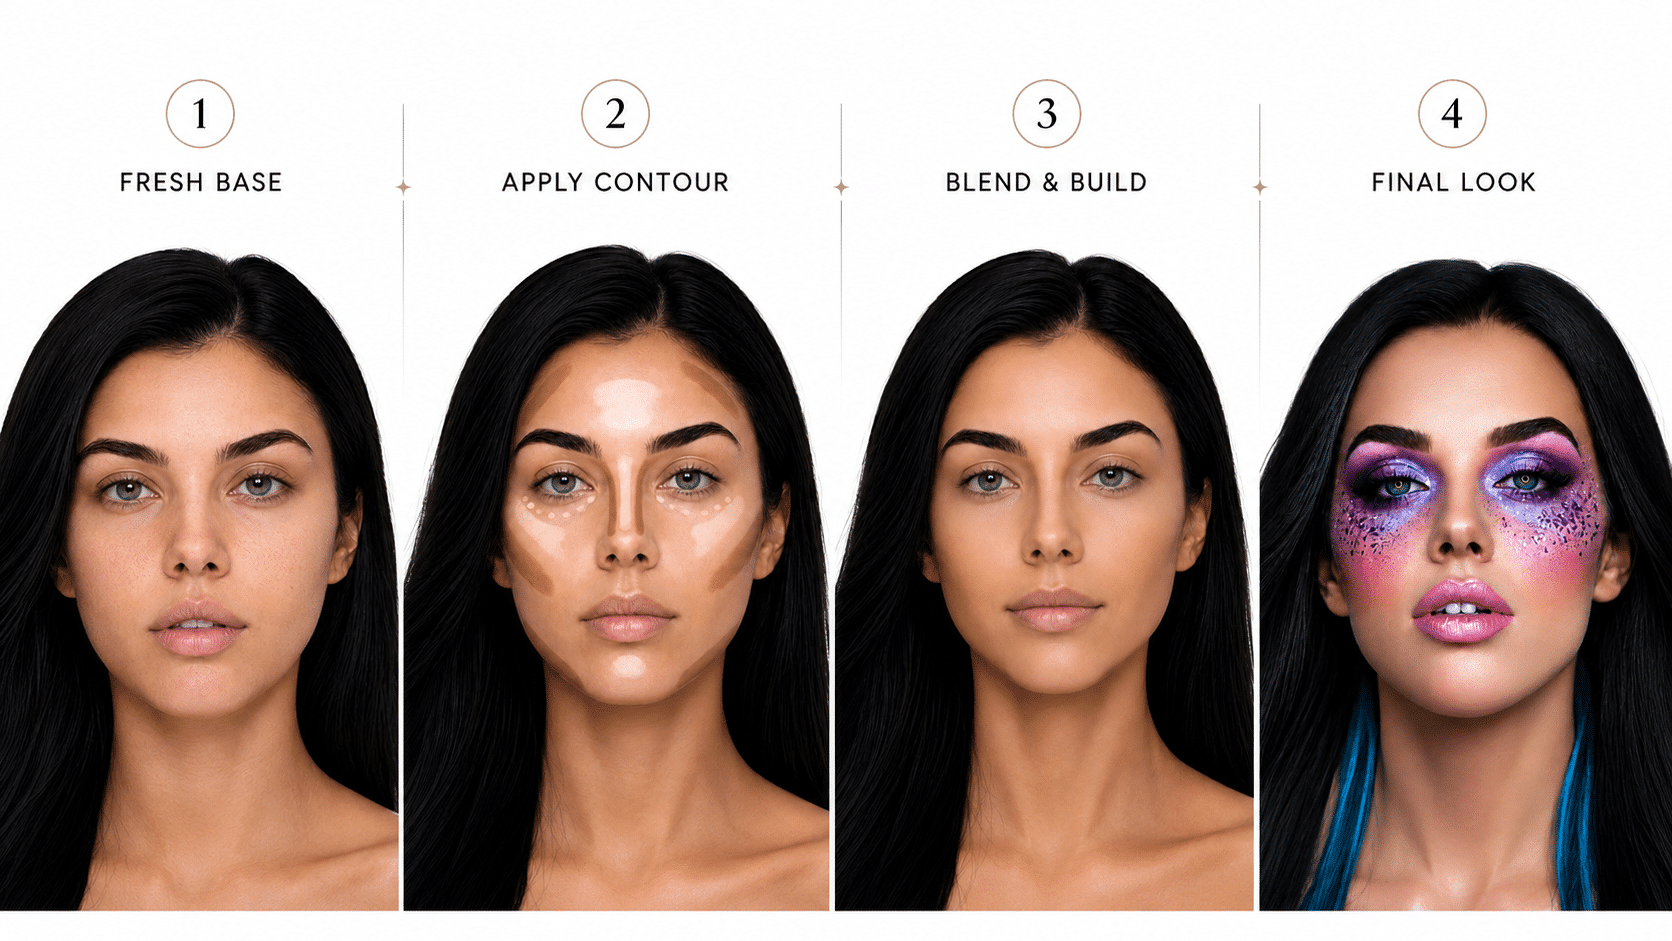
This general routine works beautifully for most face shapes. You can adjust the exact placement using the shape-specific sections below.
1. Map Your Hollows
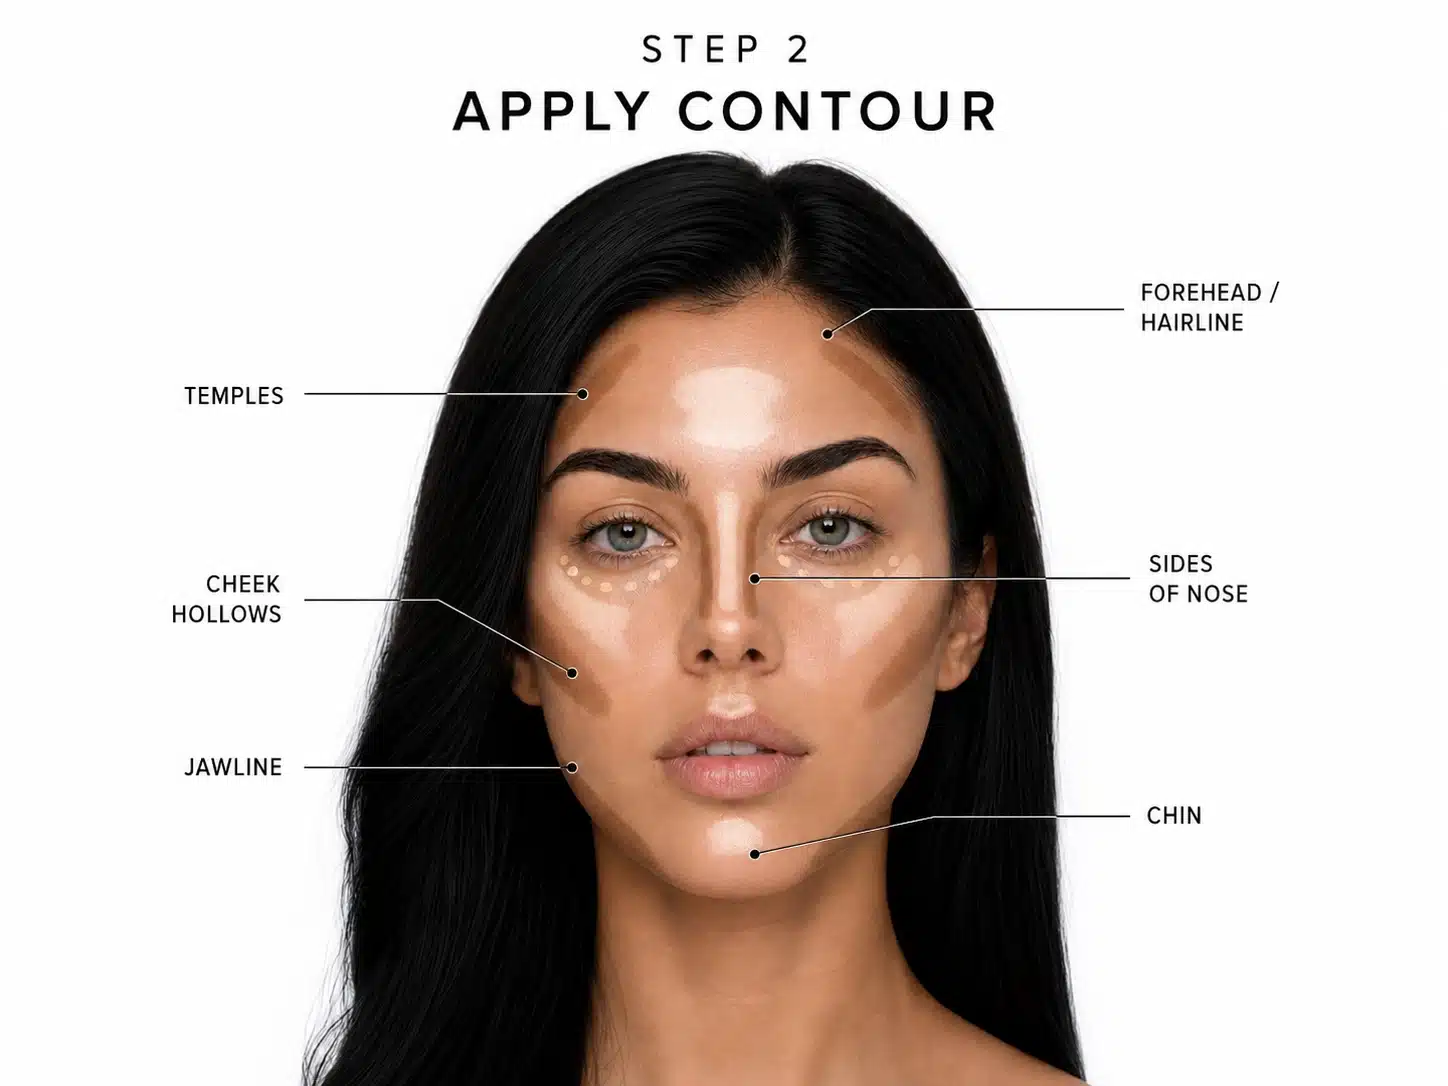
Feel just under your cheekbone toward the top of your ear. Make a soft “fish face” to locate the natural hollow—your contour should sit just above this line, not below it, to keep the face looking lifted.
2. Apply the Product
Use a synthetic brush, stick, or damp sponge to apply the product. Place the contour under your cheekbones, starting near the ear and fading inward. Apply it lightly along the sides of the forehead near the hairline and softly along the underside of the jawline to define the boundary between your face and neck.
3. Start Blending
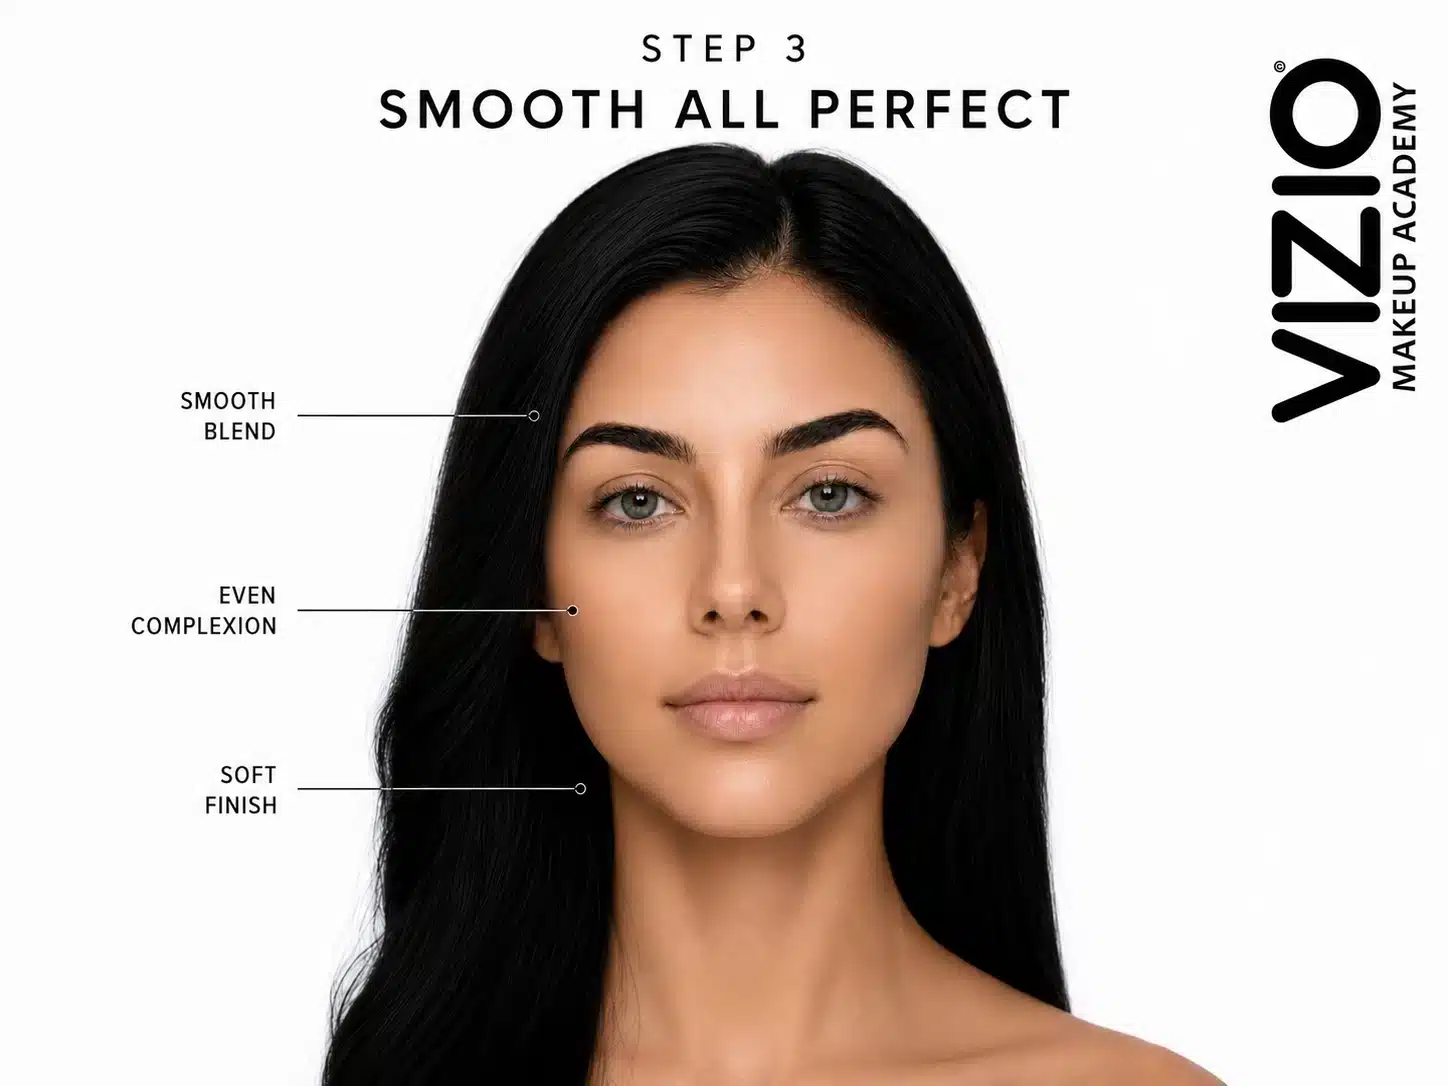
Using a makeup sponge or a fluffy brush, blend the product using upward strokes toward the cheekbone and hairline. Never drag your contour downward, as this can make the face look droopy.
4. Apply Highlighter
Place your highlighter on the tops of the cheekbones, down the bridge of the nose, on the cupid's bow, and lightly in the center of the forehead.
5. Add Blush
Place your blush slightly above your cheek contour, blending it softly inward and upward toward the temples to tie the look together.
Cream vs. Powder Contour: Quick Comparison
| Feature | Cream Contour | Powder Contour |
|---|---|---|
| Ideal Skin Type | Normal, dry, mature | Combination, oily |
| Blending Style | Slower and highly forgiving for beginners | Quick and built up in thin layers |
| When to Apply | Directly after liquid foundation, before setting powder | After foundation has been set with translucent powder |
| Finish | Dewy, skin-like, radiant | Matte, long-wearing, oil-controlling |
The Hybrid Method: For maximum longevity on long days, apply cream contour first to establish the structure, set your face, and then lightly dust a soft powder contour or bronzer on top.
How to Contour for Your Unique Face Shape
Face shape matters because contour placement that flatters one structure can look unnatural on another. Many people have a mix of features—treat these as flexible guidelines rather than strict rules.
Test Your Look: Take a selfie in natural light before and after contouring to see exactly how subtle shadow placement changes your proportions.
1. How to Contour a Round Face
A round face is roughly equal in length and width, featuring soft angles and fuller cheeks. The goal is to add gentle vertical definition and dimension.
- Contour Placement: Apply around the sides of the forehead and temples, beneath the cheekbones angled upward toward the ears, and softly along the outer jawline.
- Highlight: Center of the forehead, tops of the cheekbones, bridge of the nose, and center of the chin.
- Blush: Sweep blush higher on the cheekbones rather than directly on the apples.
2. How to Contour an Oval Face
An oval face is slightly longer than it is wide, with naturally balanced proportions. Only subtle contour is needed.
- Contour Placement: Keep contour close to the hairline. Apply a light sweep beneath the cheekbones beginning near the ears and a touch along the top of the forehead and chin.
- Highlight: Tops of the cheekbones, center of the forehead, and bridge of the nose.
- Blush: Place blush on the outer apples and blend gently toward the temples.
3. How to Contour a Square Face
A square face features a broad forehead, a strong jawline, and similar width across the forehead, cheeks, and jaw.
- Contour Placement: Focus on the outer forehead, temples, and sharp jawline angles. Use rounded blending motions.
- Highlight: Center of the forehead, tops of the cheekbones, and middle of the chin.
- Blush: Apply blush in soft rounded strokes on the apples of the cheeks.
4. How to Contour a Heart-Shaped Face
A heart-shaped face has a wider forehead and prominent cheekbones that taper down to a narrower or pointed chin.
- Contour Placement: Apply along the sides of the forehead and temples. Sweep beneath the cheekbones starting near the ear and fading halfway across the cheek.
- Highlight: Beneath the eyes, center of the forehead, and gently on the center of the chin.
5. How to Contour a Diamond Face
A diamond face is widest at the cheekbones, paired with a narrower forehead and pointed jawline.
- Contour Placement: Apply light shading beneath the highest part of the cheekbones, sweeping from the ear downward. Add a small amount at the temples.
- Highlight: Center of the forehead, beneath the eyes, and along the jawline.
6. How to Contour an Oblong or Rectangular Face
An oblong or rectangular face is noticeably longer than it is wide. The goal is to create the appearance of slightly less length.
- Contour Placement: Apply contour across the upper forehead, beneath the cheekbones using a horizontal placement, and lightly along the bottom of the chin.
- Highlight Placement: Apply beneath the eyes and to the tops of the cheekbones. Avoid extending highlight too far down the center.
- Blush: Place blush across the apples and blend outward.
7. How to Contour a Triangle or Pear-Shaped Face
A triangle or pear-shaped face generally has a narrower forehead and a wider, more prominent jawline.
- Contour Placement: Apply contour around the outer corners of the jawline and lightly beneath the cheekbones. Avoid heavily contouring the forehead.
- Highlight Placement: Apply highlight to the forehead, beneath the eyes, and tops of the cheekbones.
- Blush: Blend blush upward toward the temples.